3.7 Setting up iOS OTA provisioning
You can configure MyID to enroll a certificate on your iOS device using Over the Air (OTA) provisioning. The update appears on the device as a profile to be installed when you are issuing a mobile identity.

This feature requires the following additional web service modules to be installed and configured on your MyID server:
-
SCEP API – Simple Certificate Enrollment Protocol (SCEP) device identities.
You must follow the instructions in the Managing devices section of the Administration Guide for setting up your SCEP server before setting up iOS OTA provisioning. You do not need to request or collect any SCEP device identities.
-
Mobile iOS OTA – OTA (Over The Air) provisioning of certificates to iOS.
3.7.1 Setting up the application pool for iOS OTA
After you have installed MyID with the Mobile iOS OTA module, you must update the Load User Profile option for the application pool used by the service:
- In Internet Information Services (IIS) Manager, select View Application Pools.
- Right-click the MyIDiOSOTA_Pool, then from the pop-up menu select Advanced Settings.
- Set the Load User Profile option to True.
- Click OK.
- Right-click the MyIDiOSOTA_Pool, then from the pop-up menu select Recycle.
3.7.2 Setting up a signing certificate for iOS OTA
The web services have to be able to sign the information being sent to the phone and so require a signing certificate to be issued. No specific attributes are required: any certificate that can be used for signing data is suitable.
- On the MyID web server, log on using the MyID web service user.
-
Request a certificate that will be placed in the CAPI store. You can issue a certificate from any certificate authority as long as it is available to CAPI.
Note: Do not enable strong private key protection on the certificate, as this will prevent processing of the request by the MyID account.
-
Once the certificate has been generated, copy its thumbprint data into the SigningCertThumbprint value in the Web.config file for the MyIDiOSOTA web service.
By default, this is in the following folder:
C:\Program Files\Intercede\MyID\SSP\MyIDiOSOTA\
-
Copy the same certificate thumbprint data into the iOSOTA:SigningCertThumbprint section of the appsettings.Production.json file of the rest.provision web service:
-
As an administrator, open the appsettings.Production.json file in a text editor.
By default, this is:
C:\Program Files\Intercede\MyID\rest.provision\appsettings.Production.json
This file is the override configuration file for the appsettings.json file for the web service. If this file does not already exist, you must create it in the same folder as the appsettings.json file.
-
Edit the file to include the following:
Copy"iOSOTA": {
"SigningCertThumbprint": "<certificate thumbprint>"
}where <certificate thumbprint> is the thumbprint of the signing certificate.
- Save the appsettings.Production.json file.
-
Recycle the web service app pool:
- On the MyID web server, in Internet Information Services (IIS) Manager, select Application Pools.
- Right-click the myid.rest.provision.pool application pool, then from the pop-up menu click Recycle.
This ensures that the web service has picked up the changes to the configuration file.
-
3.7.3 iOS OTA certificate requirements
This section contains some specific issuance requirements for the certificate template for a Microsoft Certificate Authority for iOS OTA issuance.
-
The certificate you use for iOS OTA issuance must have the CA certificate manager approval option deselected.
-
Set the Policy type required in signature drop-down list to Application policy.
-
Set the Application policy drop-down list to Certificate Request Agent.
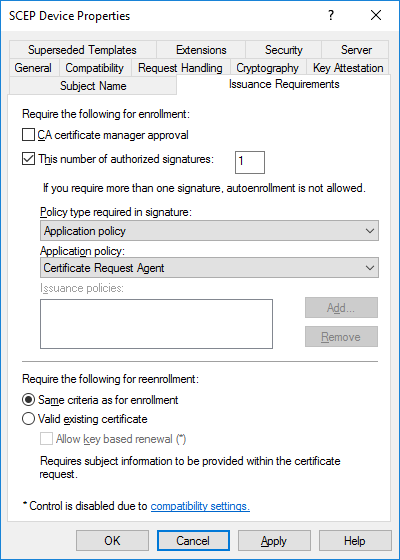
If you see a message in the "Failed requests" section of the CA similar to:
One or more signatures did not include the required application or issuance policies. The request is missing one or more required valid signatures.
this means that the Application policy option is set to Any Purpose instead of Certificate Request Agent.
3.7.4 Configuring MyID for OTA provisioning
To configure MyID for OTA provisioning:
-
Create an Identity Agent credential profile that uses the following:
-
A Card Format of Mobile.
-
One or more certificates that uses the System Store container.
See section 3.8, Setting up the Identity Agent credential profiles for details.
-
-
Create a Device Identity (Only) credential profile that uses the following:
-
Require Challenge option selected.
See the Setting up a credential profile to use to issue device identities section in the Administration Guide for details of completing the credential profile.
See also section 3.7.3, iOS OTA certificate requirements for details of the requirements for the device certificate.
-
- From the Configuration category, select Operation Settings.
- Click the Certificates tab.
-
Set the following options:
-
iOS OTA Credential Profile – set this option to the name of the Device Identity credential profile.
-
iOS OTA Organization – set this option to the name of your organization. This appears on the OTA provisioning message on the mobile device.
-
iOS OTA Display Name – set this option to a name for the OTA update. This appears on the OTA provisioning message on the mobile device.
-
iOS OTA Description – set this option to the description for the OTA update. This appears on the OTA provisioning message on the mobile device.
-
-
If required, you can customize the transform on the web services server that is used to display the intermediate web page that presents a link to the CA root certificate and the Enroll page used to provision the certificates.
See the iOS OTA web page section in the Web Service Architecture guide for details.
- Click Save changes.